
Explore a Georgian Mega Mansion and Build Your Own Model
Discover the story of Henrietta Howard and how she created Marble Hill, a grand villa next to the Thames in Twickenham in London, in the early 18th century. When you've read the story of the house you can then create your own mini model of it!
Generous Gift
Henrietta Howard was born in 1689. When she was a teenager, she married Charles Howard, a distant relative. This marriage was not a happy one and soon the couple were poor. Henrietta saved up money for her and Charles to go to Hanover in Germany to make friends with the future king of England — George I. Henrietta was given a job as a Woman of the Bedchamber for the king's daughter-in-law, Caroline, Princess of Wales. She became the mistress to Caroline's husband, George, Prince of Wales (later George II). Henrietta had a difficult role of trying to keep both the prince and princess happy.
In 1723 the Prince of Wales gave Henrietta a large gift of £11,500 (over £2 million today) in stock in the Bank of England and South Sea Company. With this money, Henrietta decided to build a fashionable house in Twickenham, called Marble Hill. This house was going to be her retreat from her demanding job.
Classical Style
She decided to build it in the Palladian style, which is a classical style of architecture based on the work of the 16th-century Italian architect Andrea Palladio. He had been inspired by the architecture of ancient Rome. Palladian buildings are usually symmetrical (they look the same on both sides) and have classical elements such as columns.
To create her beautiful house Henrietta enlisted the help of the architect-builder Roger Morris and the 'architect-earl', Henry Herbert, 9th Earl of Pembroke. The gardens were also carefully designed and laid out with the help of the poet Alexander Pope and the royal gardener, Charles Bridgeman. When completed, Marble Hill was one of the most fashionable villas along the Thames. Henrietta regularly held parties and entertainments for poets and writers such as Jonathan Swift and John Gay. Marble Hill and its glorious gardens still look much the same today as they would have in Henrietta's time.
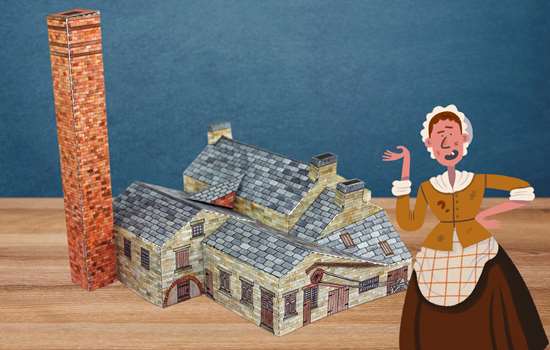
Make Your Own Model of Marble Hill
Now you can make your very own model of Marble Hill. Ask an adult to download our template and print it out for you, then follow the instructions below to build a mini version of this grand Georgian villa.
Once you've completed it, put your model on display and imagine yourself living in this huge house like Henrietta Howard did!
Download The TemplateHOW TO BUILD YOUR MODEL OF MARBLE HILL
YOU WILL NEED
- Print outs of the model house templates
- Scissors
- Glue stick
-

STEP 1
Cut out the front wall, back wall and two side walls. Also cut out the rectangular roof base.
-

STEP 2
Fold along the dotted lines and glue the four walls together in this order: back wall, side wall, front wall, side wall.
-

STEP 3
Fold the long tabs down at the top of the four walls to create a platform.
-

Step 4
Put glue along these tabs and stick the roof base on to this platform. You'll notice that the house becomes a lot stronger.
-

Step 5
Cut out the two large tiled roofs.
-

Step 6
Fold along the dotted lines and glue the two roofs together, as shown. Put glue on the tabs and bring the two sides together to complete the roof.
-

Step 7
Slot the roof into the top of the building, putting glue on the sides of the roof to secure it to the side of the building.
-

STEP 8
Cut out the front and back façades (the outer sections of the building that stick out). Use a small pair of scissors (nail scissors are ideal) to cut in between the pillars, window and door of the front façade.
-

STEP 9
Fold along the dotted lines, then put glue on the tabs and bring the sides together to create the shape of each façade.
-

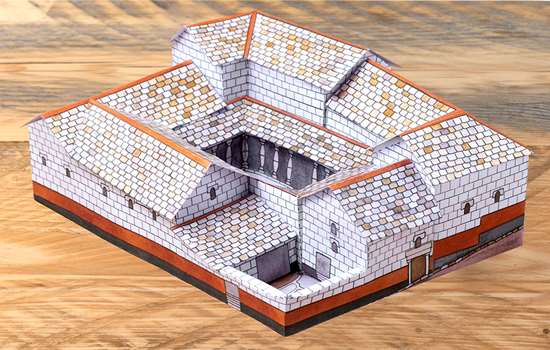
STEP 10
Put glue on the two triangular tabs at the top of the back façade, and stick it in the middle of the roof, using the guidelines printed on the roof to help.
-

STEP 11
Repeat for the front façade.
-

STEP 12
Tuck the bottom of the façades underneath the walls to secure. Add some glue or a piece of tape to keep them in place.
-

STEP 13
Cut out the four chimneys and four dormer windows.
-

STEP 14
Fold along the dotted lines of the chimneys. Put glue on the large plain tab (on the right-hand side in the picture) and fold the sides of the chimney in to create a rectangular tube.
-

STEP 15
The top and bottom are not glued, so fold over the grey sections and tuck in the small tabs to secure. The bottom of each chimney is slanted (so that they can sit on the roof) and the top is flat. Repeat for each of the four chimneys.
-

STEP 16
Fold along the dotted lines on the dormer windows and put glue on the tabs to secure. Repeat for each of the four dormer windows.
-

STEP 17
Finally, glue the chimneys and the dormer windows to the roof, as shown. Position two chimneys on the left, two chimneys on the right, two dormers at the front and two dormers at the back.
Build an entire street through history

The Kids Rule! guide to Fashion & Fads (issue 26)
Read Kids Rule! magazine online to learn about the fashions and fads linked to our sites plus many more. You can take our quiz to see if you could make it as a 1930s architect, explore the story behind Queen Victoria's family portrait, and discover the most bizarre fads from history!
This is issue 26 in our series of Kids Rule! magazines following the history of England. Each issue is designed to help you discover more about our properties through fun facts, illustrated stories and games.
Read the magazine