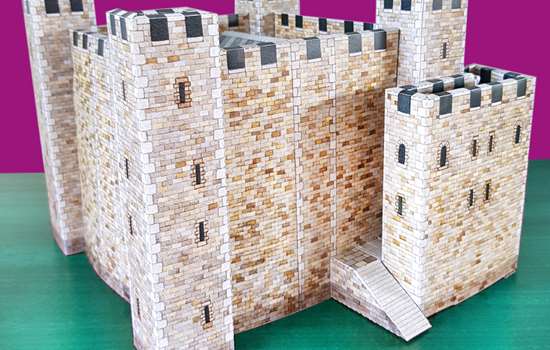
Make your own cardboard castle
If you’ve always wanted to be the queen or king of your own castle, here’s your chance. Just follow these simple step-by-step instructions to create a fun fortress!
Watch our video guide to build your own cardboard castle
Watch our video to discover how to design and build your own cool castle out of cardboard. Find out how to add battlements, towers and a drawbridge to make the ultimate mini fortress!
HOW TO BUILD YOUR CASTLE
YOU WILL NEED:
• Four identical pieces of cardboard (approximately 25 x 20cm)
• One piece of cardboard (approximately 40 x 40cm)
• Four kitchen roll tubes
• String
• Two paper fasteners
• Pencil
• Black marker pen
• Ruler
• Masking tape
• Blue, green, brown and grey paint
• Paintbrush
• Scissors
• Craft knife and board
-

Step 1
Draw a crenellated pattern (battlements) on the top of your four pieces of card. Measure them out so they are identical in size.
-

Step 2
Cut out the walls of your castle. You can use a craft knife and cutting mat, if you have them, but you could also use a pair of scissors.
-

Step 3
Draw a crenellated pattern on the top of four kitchen rolls and cut them out using scissors.
-

Step 4
Cut a slit up the side of the tower to match the height of the castle wall. Then turn the tower around 90 degrees and cut another slit up the side. Repeat the process with the three other tubes. These will slot over the corners of your castle.
-

Step 5
Draw the outline of a drawbridge on one of the pieces of card and cut it out. Make sure you keep the drawbridge.
-

Step 6
Take the large piece of cardboard to make the base. Use one of the walls to measure out the size of your castle, then draw out a moat to surround it.
-

Step 7
Paint a grey square for your castle floor, using your markers as a guide. Then paint a blue moat around it, surrounded by some green grass.
-

Step 8
Now decorate your castle. Paint the walls and towers grey, and paint your drawbridge brown. You can also add in some windows using the marker pen.
-

Step 9
Using a pencil, make two holes in the drawbridge, at the top left and top right, and on either side of the door frame (see the next photo to see the position for these).
-

Step 10
Cut two pieces of string the same length, and tie a knot at one end of each piece. Tighten each knot around the head of a paper fastener. Thread the fasteners through the holes in the drawbridge and fold them out.
-

Step 11
Assemble your castle by placing the pieces of wall next to each other flat on the table. Make sure they’re lined up and then use masking tape to tape them together.
-

Step 12
Slot your towers over the corners of the castle using the cuts you made earlier. Then thread the string from your drawbridge through the two holes in the wall and create a hinge at the bottom using masking tape. Finally, add a flag for extra decoration!